Butterfly Spread: How Traders Can Use This Multi-Leg Options Strategy to Trade Range-Bound Markets While Managing Risk
May 27, 2026

By Shane Neagle
Intermediate options traders, those who start using multi-leg trading strategies, often turn to the Butterfly Spread. This approach is structured to help traders potentially capture premium income in rangebound or stagnant markets, so it’s a favorite among traders whose market outlooks anticipate stability rather than significant price movements.
The two key factors of any trade, potential risk and potential reward, are both predefined in a Butterfly Spread. While the ceiling for gains and floor for losses is known ahead of time, executing the strategy effectively can hinge on precision and discipline.
Butterfly spreads and other multi-leg strategies can appeal to traders who prefer approaches that have high visibility and allow for strategic strike selection. Thanks to TradeZero’s new multi-leg functionality, executing complex setups such as these and, if necessary, fine-tuning them can become a simpler process. In this guide, we’ll dive into the structure, advantages, and disadvantages of the Butterfly Spread.
What Is a Butterfly Spread?
A Butterfly Spread is a defined-risk, directionally neutral options trading strategy that typically consists of four legs. The strategy is structured to help traders potentially benefit from minimal price movements, to be precise, when the price of an underlying asset remains near a chosen target at the time of the options contracts’ expiration.
In essence, a Butterfly Spread is created when a trader combines two vertical spreads that have the same expiration date. This involves selling two options at a middle strike price, which forms the “body” of the butterfly, while simultaneously buying two options; one at a higher strike, and one at a lower strike, which form the “wings” of the position.
The symmetry of the setup helps define the zone of maximum potential gain; so long as the price of the underlying asset remains near the central strike price at the time of expiration, maximum gains can potentially be achieved.
There are two main variations of the Butterfly Spreads, depending on whether call options or put options are used. In either case, the risk and reward profiles are identical, so the choice between the two usually boils down to a matter of liquidity.
How the Butterfly Spread Works
As is the case with all multi-leg options trading strategies, the Butterfly Spread can initially appear a bit daunting and abstract. To try and help keep things grounded and tie everything together, we’ll use a simple, hypothetical example to illustrate and make the trade’s structure and purpose clearer.
Let’s say that our hypothetical trader wants to construct a long call Butterfly Spread. The setups, as we mentioned, consist of four legs, all of which have the same expiration date. Those legs are as follows:
- A purchased in-the-money (ITM) call at a lower strike price
- A sold or short at-the-money (ATM) call at the middle strike price
- Another sold ATM call at the middle strike price, identical to the previous leg
- A purchased out-of-the-money (OTM) call at a higher strike price.
The key is to have the strike prices evenly spaced; in other words, the purchased ITM call and the purchased OTM call, the “wings”, are equidistant in terms of strike price from the sold calls that form the “body”.
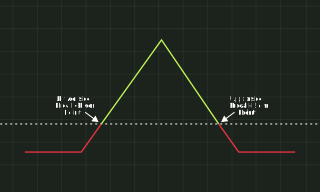
The two short options contracts can capture premiums, while the two long options serve to help limit downside and upside risk. As a result, we have a defined zone of potential profit centered on the middle strike price.
When Can Butterfly Spread Be Used
Now that we’ve covered the structure, or “how” of the approach, it’s time to move on to the “why”, the scenarios in which an options trader may consider using the Butterfly Spread strategy.
As we mentioned, the most common use case of the Butterfly Spread is when a trader anticipates periods of muted price action or range-bound trading. In low-volatility scenarios such as these, the underlying asset’s price may have a higher likelihood of staying within the desired range.
While low volatility can create favorable setups, experienced traders often focus on clearly-defined price points, leveraging technical analysis, or focusing on key resistance levels to identify potential price targets.
Clear trends, whether bullish or bearish, can make the Butterfly Spread a less favorable proposition. In contrast, periods of range-bound trading may provide a more suitable backdrop for putting the strategy into play, since the lack of decisive price action is typically what traders are after.
One commonly used approach is to wait for major news events, whether we’re talking about macroeconomic catalysts such as FED rate cuts, job data, central bank meetings, or ticker-specific catalysts such as earnings calls, and look to take advantage of the post-news lull in volatility.
There’s one final point we should mention here, and that is the fact that Butterfly Spreads can be adjusted to account for directional bias. If traders have a slightly more bullish or bearish market outlook, they may consider deploying a Skewed Butterfly Spread or a Broken Wing Butterfly.
Skewed Butterfly Spreads have wings that are not equidistant. While potential losses and potential gains remain symmetric, the zone of maximum potential gain is skewed toward one of the purchased calls. Broken Wing Butterflies also have uneven wings, but the difference in strikes tends to be much greater, and this is usually done to express a much clearer directional view while also potentially reducing net debit, sometimes even resulting in a small net credit at entry.
Risk, Reward, and Breakeven Points
Having a clear understanding of how the Butterfly Spread works is important for traders who want to effectively apply the strategy over time.
We’ve already covered the setup’s structure, but like all multi-leg options trading strategies, it can appear a bit arcane and abstract at first glance. To counteract that, we’ll turn to a hypothetical example to hopefully help tie everything together.
If we suppose that a stock is trading at $100, and that our hypothetical trader is anticipating muted price action, they could:
- Buy a $95 call
- Sell a $100 call
- Sell another $100 call
- Buy a $105 call
In addition, let’s imagine that setting up the trade costs $2, which is the net debit from the setup. That net debit is equal to the maximum theoretical loss of the trade.
In contrast, the maximum potential gain would occur if the price were to finish near the $100 strike at expiration. If that ends up being the case, the two short calls that form the body expire worthless, as does the $105 call, but the $95 call would end up being worth $5. Once we subtract the $2 debit, we’re left with the maximum potential gain of the trade, which is $3.
However, if the underlying asset’s price at the time of expiration drifts too far to either side, gains can quickly be eroded.
To calculate the trade’s breakeven points, we take the lower strike price and add the net debit on one side, and take the upper strike price and subtract the net debit on the other. In this case, that means $95+$2=$97 for the lower breakeven, and $105-$2=$103 for the upper breakeven.
How does that work? Well, at $97, the $100 calls and the $105 call are worthless, the $95 call, however, is worth $2. However, since we paid $2 in premiums, the trade is at a breakeven. At $103, the $95 call is $8 in the money,but since the two $100 calls we sold are each $3 in the money for a combined loss of $6, and we paid $2 in premiums, the trade is once again at a breakeven.
So, what makes this a defined-risk strategy? If the underlying goes below $95, all the options expire worthless, so the maximum potential loss is limited to the net debit of $2. If it goes beyond $105, the loss is still limited to $2, as the value of the long calls would increase to offset the losses from the short calls at an even rate.
Choosing the Right Spread for Your Strategy
The most pronounced factor when it comes to deciding between these two approaches will likely be your market outlook.
Credit spreads can be used in environments in which an asset’s price is anticipated to be stable or to experience only muted price action. Traders who anticipate that an asset’s price may remain rangebound or that time decay could work in their favor often lean toward this approach. Conditions of elevated implied volatility can make credit spreads more attractive to traders who seek to collect premiums, as inflated premiums allow for potentially larger credits to be collected upfront.
Conversely, debit spreads can be used in environments where traders anticipate a more defined directional move in an asset’s price. By using a debit spread, traders may reduce the cost of the position by selling another options contract, while still providing room for possible upside. As debit spreads rely less on time decay and more on price movement, they can benefit from periods of low IV.
Whichever route you end up choosing, there is one essential, non-negotiable point, and that is risk management. Before placing any trade, the key is to define acceptable potential risk. Lastly, it’s important to make the most of the tools at your disposal. Platforms like TradeZero allow users to place both legs of the trade within a single ticket, preview strike selection, see net credit or debit, and check breakeven points upfront, providing a level of spread visibility that can make position management a more efficient process.
Advantages and Limitations
The Butterfly Spread is a staple among traders who favor structure and discipline for a reason. Clearly defined potential losses and potential gains allow for a high degree of visibility; this, in turn, can align well with consistent risk management. On top of that, the approach is structured in a way that can help options traders potentially benefit from range-bound or choppy markets.
Up next, we have capital efficiency, and since this multi-leg strategy consists of both long and short contracts, the net debit required to open a position can be relatively low when compared to the debit required to open single-leg positions. This may make exposure easier to control, and combined with the aforementioned visibility, we have a strategy on our hands that may be suitable for those in search of small, consistent outcomes.
With that being said, the Butterfly Spread does come with a certain set of disadvantages. For one, the profit potential is limited, and success largely depends on being precise in strike selection. In addition, the position can also be sensitive to any changes in the underlying asset’s price, time decay, and volatility; as can be seen in our earlier example, even small deviations from the middle strike tend to quickly erode potential returns.
What are the risks associated with Butterfly Spreads?
A butterfly spread carries several risks that traders should understand before using it:
- The strategy’s limited profit potential is a primary drawback, as gains are capped and rely on the underlying asset expiring near the middle strike. If the price moves too far in either direction, the position can lose value quickly, even though risk is defined.
- Butterfly spreads are also sensitive to time decay and implied volatility changes; a drop in volatility or an unexpected move early in the trade can reduce the spread’s value long before expiration.
- Liquidity risk may arise if the options involved have wide bid-ask spreads, increasing execution costs.
- Additionally, assignment and exercise risks can occur near expiration when American-style options are involved.
Because the strategy requires precise price behavior to reach maximum profit, traders should understand these risks and evaluate whether the market environment supports the assumptions behind the butterfly’s structure.
Conclusion
Butterfly Spreads are structured to help traders take advantage of range-bound conditions while maintaining a high degree of visibility in terms of potential losses. However, consistent application of the strategy requires careful research, meticulous strike selection, and disciplined risk management.
Provided that those elements are in place, the Butterfly Spread may offer a transparent, rules-based framework that can potentially help traders navigate low-volatility periods with a greater sense of structure and control.
Disclaimer
This content (“Content”) is produced by Tokenist Media LLC. The Content represents only the views and opinions of Tokenist Media LLC.Tokenist Media LLC’s trading experiences and accomplishments are unique, and your trading results may vary substantially. Tokenist Media LLC is a paid marketing partner of TradeZero that receives compensation from TradeZero for broadcasting, displaying, and/or presenting marketing and sponsorship materials that promote TradeZero. TradeZero does not endorse the Content and makes no representations or warranties with respect to the accuracy of the Content or information available through any referenced or linked third party sites. The Content has been made available for informational and educational purposes only and should not be considered trading or investment advice or a recommendation as to any security.
Trading securities can involve high risk and potential loss of funds. Furthermore, trading on margin is for experienced investors and traders only as the amount you may lose can be greater than your initial investment. Likewise, short selling as a securities trading strategy is extremely risky and can lead to potentially unlimited losses.
Options trading is not suitable for all investors as it can involve risk that may expose investors to significant losses. Please read the Characteristics and Risk of Standardized Options, also known as the options disclosure document (ODD) at https://www.theocc.com/Company-Information/Documents-and-Archives/Options-Disclosure-Document before deciding to engage in options trading. Please also see the Options Trading Disclosure. You must be approved to trade multi-leg options strategies. You may lose all of your principal. Executing multi-leg options orders may result in increased transaction fees compared to single-leg options orders. Multi-leg strategies may exhibit risks such as illiquidity and increased sensitivity to market unpredictability.
TradeZero provides self-directed brokerage accounts to customers through its operating affiliates: TradeZero America, Inc., a United States broker dealer, registered with the Securities and Exchange Commission (SEC) and member of the Financial Industry Regulatory Authority (FINRA) and the Securities Investor Protection Corporation (SIPC); TradeZero, Inc., a Bahamian broker dealer, registered with the Securities Commission of the Bahamas;TradeZero Canada Securities ULC, a Canadian broker dealer, member firm of the Canadian Industry Regulatory Organization (CIRO) and member of the Canadian Investor Protection Fund (CIPF) and TradeZero Europe B.V., a Dutch broker dealer, authorized and regulated by the Dutch Authority for the Financial Markets (AFM) (collectively, the “TradeZero Broker Dealers”).